This is the second part of our Ethereum introduction guide. If you haven’t read part 1, I highly recommend it to better understand this post.
Enjoy, and please do not hesitate to reach out with questions, corrections or feedback.
Index
2. Interacting with a contract
2.1. Introduction to smart contracts in Ethereum
2.2. Your first smart contract
2.3. Deploying a smart contract
2.4. Web3 and smart contracts
3. Frameworks & Tools in the real world
4. A real DApp, a token marketplace — coming soon
2. Interacting with a contract
2.1. Introduction to smart contracts in Ethereum
Well, you already know some basics about Ethereum, you’ve been interacting with an Ethereum node, sent some transactions between accounts, etc. But there is something else that makes Ethereum amazing: smart contracts.
As I explained in the introduction, a smart contract is a program that runs on the EVM. You can build any smart contract to do whatever you want, but today, most are being used for crowdfounding tools like ICOs or token sales. Allow me to explain these.
I will start with crowdfunding, a concept that I’m sure you’re familiar with. Projects do a crowdfunding campaign in order to raise funds to carry out a project. You can issue a digital asset related to your project and immediately sell it to anyone in the world, for almost zero cost. This is what we call an Initial Coin Offering (ICO).
To carry out an ICO with smart contracts, you just need to implement the logic that makes your digital assets tradable and valuable. Sounds great, doesn’t it? These are Ethereum tokens. A token is a digital asset within the Ethereum ecosystem.
Let’s try to analyze all these ideas through an example.
Suppose you have health food company that wants to launch a new brand. You decide to conduct an ICO to raise 20,000 ETH. You offer 10 tokens in return for every 1 ETH you collect, promising that contributors will be able to buy food at your stores with the tokens. To do this, you can develop a token smart contract that stores the proportional amount of tokens for each contributor.
Now, let’s suppose you raised that money, developed your project, and opened your first store. Then, you decide to sell each salad for 1 token. After a week, it turns out that you have an increasing demand, but given that the supply of salads is limited, your customers notice and start trading your tokens as an asset, raising their market value.
This process has been carried out in real life, given Ethereum allows virtually anyone to create their own tradeable, digital asset.
2.2. Your first smart contract
Let’s see how you can build a basic Ethereum token. I will use this example to make an introduction to some Solidity basics.
Please know that this examples are just for learning purposes, you should not use them in production.
[pragma solidity ^0.4.0;

contract MyToken {
 address public creator;
 uint256 public totalSupply;
 mapping (address => uint256) public balances;

function MyToken() public {
   creator = msg.sender;
   totalSupply = 10000;
   balances[creator] = totalSupply;
}

 function balanceOf(address owner) public constant returns(uint256){
   return balances[owner];
 }

 function sendTokens(address receiver, uint256 amount)
 public returns(bool){
   address owner = msg.sender;

   require(amount > 0);
   require(balances[owner] >= amount);

   balances[owner] -= amount;
   balances[receiver] += amount;
   return true;
 }
}
Let’s go step by step. The pragma keyword tells which version of Solidity you are using for your source code. Then, it begins the contract definition initiating with its name, in this case, MyToken. Next, you will find three variables:
creatoris anaddressvariable to store the owner of the contract.totalSupplyis an 256 bit unsigned int to store the amount of tokens willing to be shared with the investorsbalancesis a map from addresses to unsigned ints where the balances of each investor will be stored
Afterwards, you will find the constructor function. As you can see, it is a function with the same name of the contract, and it will be called only once every time a new instance of the contract is deployed to the network. Here is where the owner of the contract gets stored. Since every function call is a transaction, it is possible to know the owner of the contract using the sender of the transaction, that is msg.sender. Finally, the contract defines a total supply of 10,000 tokens, and assigns it to the token creator.
The next function is an easy one: balanceOf simply tells you the balance of an address received by parameter. Maybe you are wondering what the constant keyword means. Well that’s because Solidity has two kinds of functions, constants and non-constant.
Non-constant functions perform state changes. On the other hand, constant functions are read only once, meaning those don’t perform any state changes, they just read data. Actually, there are two types of constant functions:
viewdeclared functions promise not to modify the state (alias toconstant)puredeclared functions promise not to read from or modify the state
The last function is the one that allows us to trade tokens between addresses. This is a non-constant or transactional function because you will be changing balances. It expects the receiver’s address and the amount of tokens you want to transfer by parameter, and it returns a boolean representing whether the transaction has been successfully executed or not. You can skip the first line, it is just keeping the sender of the function in the owner variable.
Next, you will find two preconditions:
[...
require(amount > 0);
require(balances[owner] >= amount);
...
require is one of the methods that you can use to check conditions or make validations. It will eval a condition and revert in case that condition is not met. So, in this case, it is requiring that the amount of tokens to be transferred is greater than zero, and ensuring the sender has enough balance to send that amount.
Finally you are subtracting the required amount of tokens from the owner’s balance and adding it to the receiver’s balance:
[...
 balances[owner] -= amount;
 balances[receiver] += amount;
 return true;
}
2.3. Deploying a smart contract
Now, let’s start playing with our contract! You will need to deploy our contract to the network first. To do that, you will use a Solidity compiler for node.js called solc. You can install it by running:
npm install -g solc
Create a file called MyToken.sol, and paste the contract code into it. Then, open a terminal console in the same dir where you placed that file. First, compile it running the following command:
solcjs MyToken.sol --bin
The compiler will create a MyToken_sol_MyToken.bin file with the output. You can check that file contains just bytecode. Next, you will need to use solc to build the ABI (Application Binary Interface), an interface or template of your contract that tells you the available methods of it. This is the point of contact with Web3. Your just need to run:
solcjs MyToken.sol --abi
Then, you will see a new file called MyToken_sol_MyToken.abi with a JSON content that bassically defines the interface of your contract.
Finally you just need to deploy your contract from a node.js console using testrpc running in background. Once you have done that, let’s initialize web3:
//instance web3
Web3 = require('web3')
provider = new Web3.providers.HttpProvider("http://localhost:8545")
web3 = new Web3(provider)
Web3 gives you the possibility to parse your contract ABI and provide a JavaScript API to interact with it. Then, you just need the bytecode to deploy a new instance of that contract to testrpc. Please follow the next commands:
// load files

myTokenABIFile = fs.readFileSync('MyToken_sol_MyToken.abi')
myTokenABI  = JSON.parse(myTokenABIFile.toString())

myTokenBINFile = fs.readFileSync('MyToken_sol_MyToken.bin')
myTokenByteCode = myTokenBINFile.toString()

//deploy

account = web3.eth.accounts[0]
MyTokenContract = web3.eth.contract(myTokenABI)
contractData = { data: myTokenByteCode, from: account, gas: 999999 }
deployedContract = MyTokenContract.new(contractData)
Finally, you can check the address of your new deployed contract by calling deployedContract.address. Please save that address because you will need it to interact with your contract 😃
2.4. Web3 and smart contracts
Let’s begin by searching the token balances of your testrpc accounts. To do so, you will need to access the instance of your deployed contract first:
[contractAddress = deployedContract.address
instance = MyTokenContract.at(contractAddress)

web3.eth.accounts.forEach(address => {
 tokens = instance.balanceOf.call(address)
 console.log(address + ": " + tokens)
})
You will notice that your first account is the one that owns the total supply, which is expected. Great! Next, let’s transfer some of those tokens to another account:
[// send tokens

amount = 10
from = web3.eth.accounts[0]
to = web3.eth.accounts[1]
transactionHash = instance.sendTokens(to, amount, { from: from })

// checkout balances again

web3.eth.accounts.forEach(address => {
 tokens = instance.balanceOf.call(address)
 console.log(address + ": " + tokens)
})
You should see that now the second address has 10 tokens! And you can also search for the transaction information as you did in the first part of this guide:
web3.eth.getTransaction(transactionHash)
I also built a simple UI for this mini DApp, you can find it here. You will see a MyToken.json file that holds the ABI of our contract. I just pasted the content of the ABI generated by the solidity compiler into it. You will also find an app.js file similar to the previous app, but including the logic that I just showed you to send tokens and detailed token balances of your accounts.
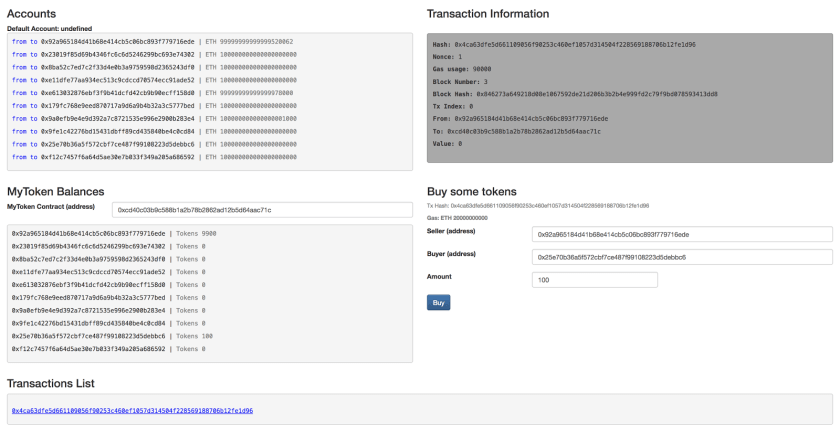
You can download this app too and start playing with it. You will be asked for the address of the contract instance that you deployed.
Thank you for reading this post, please remember that any questions, feedback, or suggestions are welcome! If you liked it, stay tuned for the third part of this guide, focused on Ethereum framework and tools.
Note: The token described in this article is not ERC20 compliant to reduce the new term overload. If you don’t know what an ERC20 compliant token is, we’ll explain it in the next article.