Thank you for your interest in this post! We’re undergoing a rebranding process, so please excuse us if some names are out of date. Also have in mind that this post might not reference the latest version of our products. For up-to-date guides, please check our documentation site.
As you are beginning with Ethereum development, and after going through some of the many excellent tutorial posts out there, you are faced with the challenge of building your first Ethereum-based app.
This brings up a set of new challenges around designing the architecture and layout of your application: traditional client-server applications now have a third new component in the mix, the blockchain.
In this article I’ll cover some of the most traditional scenarios for Ethereum applications, which arise from the different interactions between these three components. I’ll discuss serverless apps, browser plugins, private nodes, offline signing, and other issues that play a role when designing the layout of your solutions.
Client-blockchain in serverless apps
The canonical flavour of an Ethereum app is a serverless one, where the entire flow of your app happens entirely between the client and the blockchain.
The first step here is to actually distribute the client code to your users. The easiest way is to set up a static page that contains a web3-enabled web app. Such page can be hosted anywhere: AWS S3, Google Cloud, Github pages, other cloud providers, or your own server. Furthermore, if you can count on your clients having either bzz or ipfs protocol support, you can even disitribute it via Swarm or IPFS for total decentralization.
Querying the blockchain
Next step is for the app to be able to read information from the blockchain, which, as you already know, requires a connection to an active Ethereum node. This will be set by your web3 provider, which is the piece that handles the actual web3 connection to a node.
Now, some of your users may already have an established connection to a node, for instance, via the official Mist client, or through a browser plugin like the very popular Metamask, which acts like a lightweight client to the blockchain. Their FAQ even provides a code snippet on how to detect if it is available on a client, and use it as a provider for web3.
This file contains bidirectional Unicode text that may be interpreted or compiled differently than what appears below. To review, open the file in an editor that reveals hidden Unicode characters.
Learn more about bidirectional Unicode characters
| // Adapted from https://github.com/MetaMask/faq/blob/master/DEVELOPERS.md#partly_sunny-web3—ethereum-browser-environment-check | |
| window.addEventListener('load', function() { | |
| // Checking if Web3 has been injected by the browser (Mist/MetaMask) | |
| if (typeof web3 !== 'undefined') { | |
| // Use Mist/MetaMask's provider | |
| window.web3 = new Web3(web3.currentProvider); | |
| } else { | |
| // fallback – use your fallback strategy (local node / hosted node + in-dapp id mgmt / fail) | |
| window.web3 = new Web3(new Web3.providers.HttpProvider("http://localhost:8545")); | |
| } | |
| // Now you can start your app & access web3 freely: | |
| startApp() | |
| }) |
What to do then for those users who don’t have Mist or Metamask? If you only need them to query the blockchain without actually sending any transactions, you can establish a connection to a public Ethereum node. This should be a geth or parity node open to the public, but without exposing the personal API for managing accounts, and without any unlocked accounts. Such a node will only act as a gateway for querying constant contract functions. And if you don’t want to host it yourself, the great folks at Infura offer public nodes at no cost.
This way, users with a running Ethereum infrastructure can use their connections to their own trusted nodes, and less tech-savvy users can use the public nodes. This implies that the latter users are choosing to trust the information provided the third-party controlled node, for the sake of ease-of-use.
Sending transactions
Querying the blockchain is easy, but what if you want your users to submit transactions and actually perform state-changing actions on smart contracts?
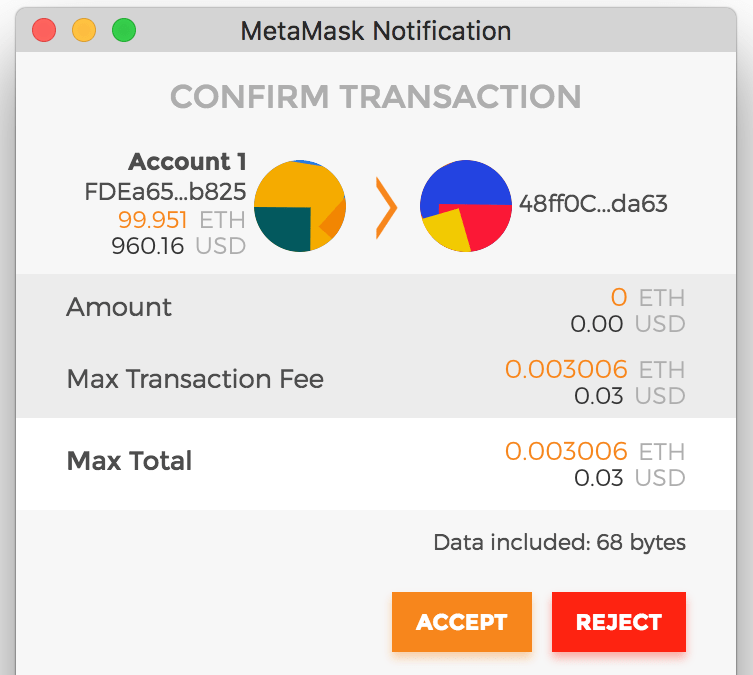
For those of your users who have Mist or Metamask installed, the problem is instantly solved, for both of them provide a way for managing the user accounts and requesting the user to approve a transaction at the application’s request. Mist will provide a gateway to the user’s local node and its accounts for signing transactions, while Metamask will sign transactions client-side and relay them to the Metamask public nodes.
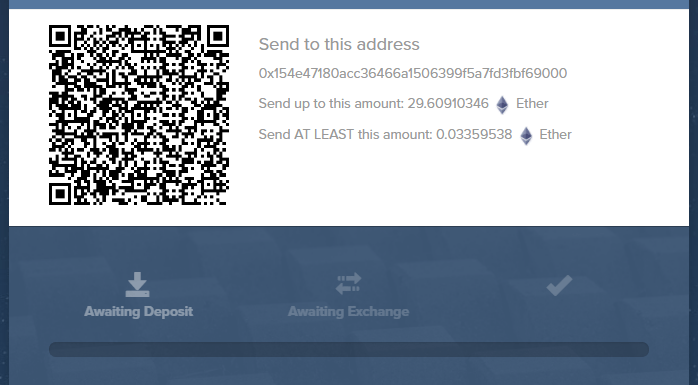
As for the rest of your users, if you don’t require them to install Metamask or use Mist to use your app, you’ll need to direct them to manually send the transactions to interact with your application, from whichever wallet they work with.
Most applications implement this by asking the user to send a certain amount of ETH to an address, optionally including a QR or a copy-to-clipboard button.
Your client-side application may then monitor the contract events to update the user interface as the transaction sent out-of-band is executed. Since watching events is simply a way of querying the blockchain, it can easily be done through a public node.
Now, for executing contract functions, you may need to request the user to send ETH along with additional data to execute a specific function. You can use the request method of a contract function to easily obtain the data needed for running a method, and present that to the user along with the target address.
SimpleToken.at(tokenAddress).transfer.request("0xbcfb5e3482a3edee72e101be9387626d2a7e994a", 1e18).params[0].data
// returns data for invoking transfer with args => '0xa9059cbb00000000000000000000000000000000000000000000000000000000000000100000000000000000000000000000000000000000000000000de0b6b3a7640000'
Personally, I am not a big fan of this pattern, for it requires a fairly complex interaction from the user. Not all users are aware of how additional data works in Ethereum, much less how to send it along in a transaction.
If you do need to implement it, make sure that your contract’s fallback function rejects all payments or has a reasonable default behaviour, so if the user forgets to include the additional data when manually sending the transaction, he does not lose the funds sent.
Note that, in many scenarios, a cleverly designed fallback function may actually always execute the expected behaviour for the user sending a transaction. This way, your smart contracts just react to users sending funds, and run different functions depending on the current state, without requiring the user to set any additional data.
Another trick is to add proxy contracts, where each of them execute a particular function in your main contract upon receiving Ether. As a simple example, let’s say you are implementing a binary voting application: you have your main contract with a vote-yes and a vote-no function. Rather than asking the user to include the yes-or-no flag in their transaction, you can deploy two additional contracts, with no logic except for calling vote-yes or vote-no in the main contract on behalf of the message sender upon receiving any transaction. Needless to say, this approach only works in rather simple apps, but can often help reduce complexity for users who do not have Ethereum-aware software in their browsers.
Implementing your own wallet
Another option for having your users perform complex interactions with your smart contracts is to actually bundle wallet management into your application. As a first step for a user, the application can create a new account for them, which will be used to send any transactions directly from your code.
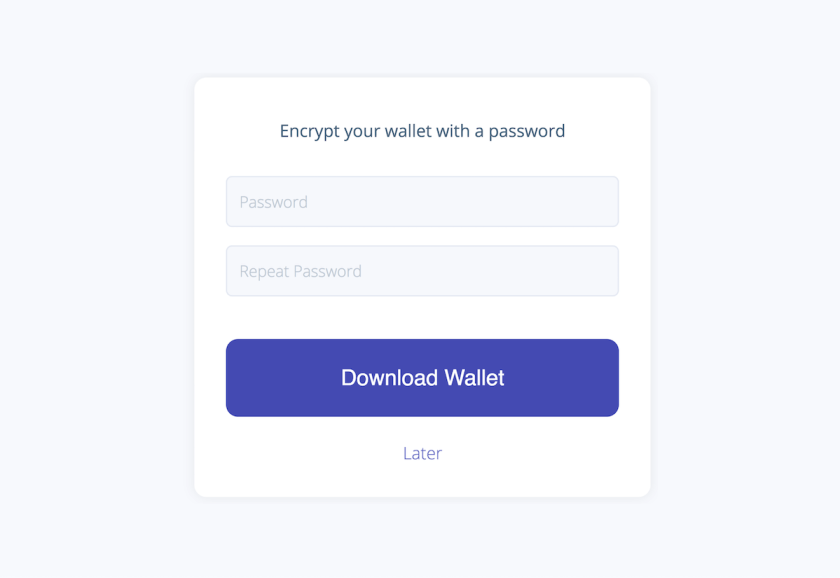
The user will then need to seed this account with some Ether, either from a different account or directly from an exchange service; consider dropping in a Shapeshift integration here for ease-of-use. Once the account has the required balance to pay for transaction fees, the client-side code may execute any needed operations on behalf of the user through a simple click.
Behind the scenes, your application will use the private key of the generated account to sign any transactions client-side, and then relay them to a public node for execution.
This pattern involves heavy coding, for you need to add the features of generating and encrypting, as well as importing, an ethereum account (you may want to take a look at the ethereum-wallet library for implementations of these tasks). Furthermore, all transactions need to be crafted and signed manually, and then sent as raw transaction to a node. It also requires more involvement from the user, who is tasked in setting up a new account, and having the responsibility of safekeeping the account file.
Nevertheless, once set up, your user can perform Ethereum transactions directly from your application with zero friction at all, and without needing to install any software at all.
All in all, which approach you use will depend heavily on the kind of users you are reaching out to, as well as the kind of interaction you expect they will have with your application, whether it is continuous usage, or infrequent or one-time accesses.
Server-to-blockchain
Now, let’s add a server into the mix, and leave the client aside for this section. As such, the following may apply not just to app servers, but also to standalone apps, scripts, or batch processes.
Setting up a local node
The first solution is the vanilla one: set up a local Ethereum node and use its JSON RPC interface from your application to perform all your blockchain operations.
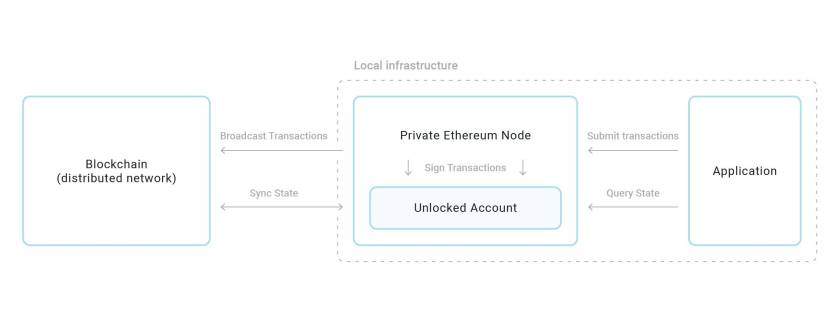
You may also want to keep an unlocked account for running transactions from your application (the unlock flag for both Geth and Parity may come in handy here). Just make sure the JSON RPC interface of the node is not accessible from anywhere but your application, otherwise anyone may access your node and steal your funds. As an additional precaution, keep the funds on the unlocked account to a minimum, and seed it from a different source as needed.
Offline signing and public nodes
Another solution, similar to one explored in the previous section, is to have your app sign transactions offline, and relay them to a public node. This article explores how to set up a web3 provider engine in your Truffle configuration to transparently sign transactions offline and send them to an Infura node.
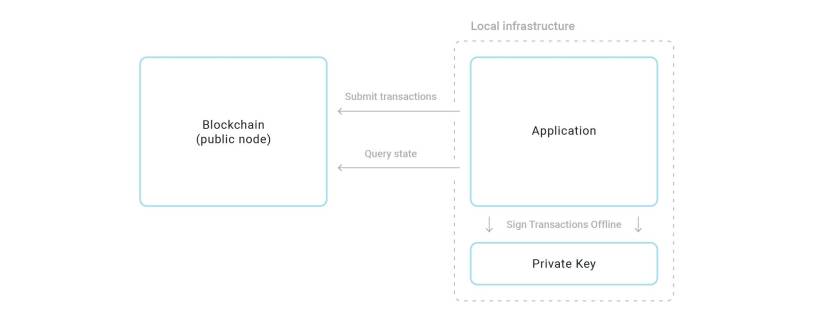
If you go down this route, keep in mind that you are blindingly trusting the public node you are connecting to: albeit it cannot modify the transactions you send to it, it can choose to not relay them to the network, or to provide fake responses to your queries. This could be mitigated by connecting to multiple nodes simultaneously, and sending the same transactions or queries to all of them; but this makes your codebase much more complex.
Tying it all together
After going through different ways of setting up client-blockchain and server-blockchain queries and transactions, it’s time to discuss how to orchestrate everything together.
Coordinating client and server
Having both client and server interacting simultaneously with the blockchain implies that you may need to coordinate both of them. For instance, you may want to have the server react to an action performed on-chain by a client, or visualize in a client certain state-changes on a contract.
The canonical way for observing changes on a contract, from both client and server, is to listen for contract events. Design your events carefully, to ensure all relevant actions have an associated event, and use indexed arguments so observers can filter only the events relevant to them. Typically, a client will only listen for events that affect them directly, while servers may monitor all the contracts related to the app.
You may also directly monitor specific transactions if they are issued directly from your application code, in order to check that they are successful.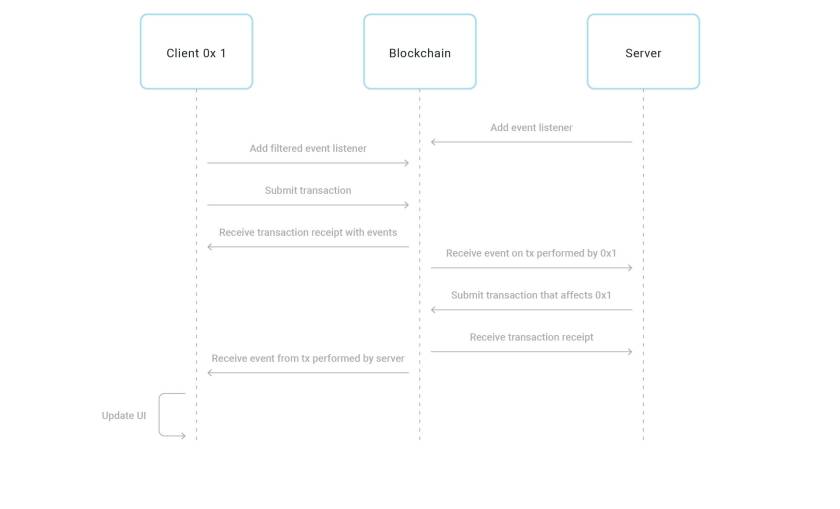
Clients may also post to the server the id of a transaction they issued as a proof of an action executed on-chain, rather than having the server listen for events. However, keep in mind that a malicious actor may be monitoring transactions on-chain, and could push to the server a transaction id from a different client, pretending it belonged to him. Make sure to use client-to-server messages only as notifications, and not as sources of truth.
Regardless of relying on monitoring transactions or events, ensure to only react upon them after a reasonable number of confirmations. Even if you have a transaction mined, it could still be subject to a chain reorganisation, and eventually run in a different context, potentially becoming invalid. Wait for about a dozen blocks (more in testnets) before acting upon an on-chain event, though consider letting your end-user know that the transaction was successful yet is unconfirmed, so as not to keep them in the dark.
Server responsibilities
Now, a critical question that you need to answer is why do you need a server at all. In traditional client-server apps, the server acts as a permanent storage, enforces bussiness logic, and coordinates clients; all tasks that can now be performed on-chain.
Nonetheless, there are still many uses for a server backing your app. First and foremost, on-chain code cannot directly work with off-chain services. This means that if you want to integrate with third party services, inject external data like USD/ETH rates, or perform basic actions such as sending an email, you need a server to take care of this.
The server can also act as as cache or indexing engine for your smart contracts. While the ultimate source of truth is the blockchain, your clients may rely on the server for search capabilities, and validate the returned data on-chain.
Large data storage is prohibitively expensive today on Ethereum, due to the gas costs incurred in using contract storage. As such, your application may also rely on a server for storing large blobs of data, while only a hash is kept on-chain for verification. The same happens with complex computations, which may exceed the Ethereum block gas limit, and thus need to be run in separate infrastructure.
It’s worth mentioning that more and more projects are appearing around the EVM that provide seamless integration with these services. Some examples are Filecoin or Storj for storage or Truebit for computation. Eventually, servers may become thinner and thinner until they disappear into a myriad of side-chain services and integrations. Maybe, a few years from now, this post will be obsolete and our blockchain applications will be running in an absolutely decentralized fashion.
Thanks to: Manuel Araoz, Demian Brener, and Francisco Giordano.