By Alejandro Santander in collaboration with Leo Arias.
Thank you for your interest in this post! We’re undergoing a rebranding process, so please excuse us if some names are out of date.
Note: This article is part of a series. If you haven’t read the previous article, please have a look at it first. We’re deconstructing the EVM bytecode of a simple Solidity contract.
- Deconstructing a Solidity Contract — Part I: Introduction ✔
- Deconstructing a Solidity Contract — Part II: Creation vs. Runtime ✔
- Deconstructing a Solidity Contract — Part III: The Function Selector ✔
- Deconstructing a Solidity Contract — Part IV: Function Wrappers ⬅
- Deconstructing a Solidity Contract — Part V: Function Bodies
- Deconstructing a Solidity Contract — Part VI: The Metadata Hash
In the last article, we saw how the function selector acts as a hub or a switch of sorts in our BasicToken.sol contract. It sits at the entry point of a contract and redirects execution to the matched function of the contract the caller wants to run.
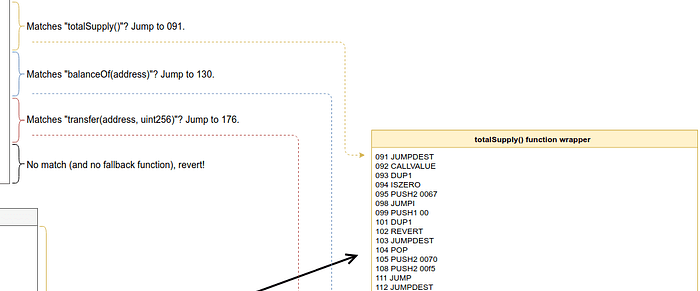
If the totalSupply function is called, execution will be redirected to location 91, balanceOf to 130, and so on.
Now let’s start a new debugging session in Remix as we’ve done before, and call the totalSupply function again. Make sure to always expand the Instructions panel, where the heart of Remix’s debugger is. As we saw before, Remix will place you at instruction 246, where the function’s body is just about to be executed. Last time, we took the Transaction slider from this position back to instruction 0, because we wanted to study the contract’s entry point and how it got to the function’s entry point from there. This time, we’re also going back (sorry!), but to instruction 91 instead of instruction 0, because there’s this thing that Solidity uses to wrap a function’s body. Don’t worry, we’ll get to the function’s body soon enough in the next article. We’re almost there; your patience will be rewarded!
So, step back to instruction 91, which is where the function selector leaves us because the function id matched totalSupply (0x18160ddd). At this point, the stack should only contain the function’s id. Now let’s walk through the code from here.

Instructions 92 to 103 will basically revert if there is value (i.e., ether) involved in the transaction. Again, this is a very common structure injected by the Solidity compiler whenever a function isn’t payable. We saw this exact same thing being used in the constructor, in Part II of the series, and it was also a non-payable function. This “non-payable check” structure will check if CALLVALUE ISZERO, and if so, will jump to instruction 103 (0x67), skipping the REVERT opcode in instruction 102.
If you called totalSupply on Remix without setting any value, we’ll reach instruction 103. Instruction 104 cleans up a zero that was left over in the stack, and then 112 (hex 0x0070) and 245 (hex 0x00f5) are pushed to the stack. Execution immediately jumps to the latter location: instruction 245. Notice that the jump occurs at instruction 111, and previously it pushed 112, so it wouldn’t be outrageous to imagine that the code is about to go do something, somewhere, and then come back that is, it will remember where we left off (112), jump, and then return.

Let’s see if that’s actually what happens by stepping to that mysterious 245 location.

If you step through 245 to 250, you’ll see that our theory was indeed correct. This “something” that the code detoured to is the actual function body, whose inner workings are not important to us right now. What’s important to the scope of this article is how the code reaches and leaves this “body-thing”, that is, how it wraps around it. It jumped into the body and out of the body. So, we see that the JUMP at 250 takes us back to 112, as we so cleverly predicted.
If this was Age of Empires, we should be hearing the Bronze Age fanfare by now. That’s right, we’re navigating through the bytecode using JUMP and JUMPI like crazy! Go ahead, play it — you deserve it.

BUT! There’s something new this time around in the stack: the number 10000 (hex 0x2710) ✨. The function body we just traversed was kind enough to put it there for us. If you were a smart contract, what would you do now? (Please don’t say, “I’d run away with all the ether”!).
Remember that we’re calling the totalSupply function. Somehow, you need to get that value from the stack into a RETURN opcode, so that it can be returned to the user. And that’s exactly what the code does between the instructions 113 to 129, where there’s an actual RETURN opcode at the end.
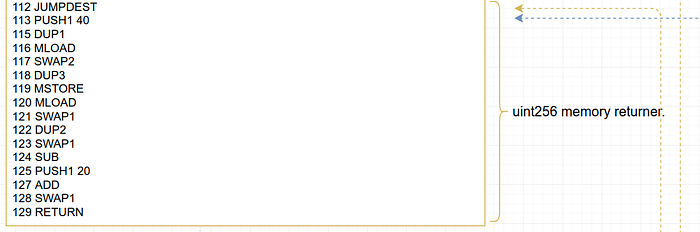
It will first read the current free memory pointer (instructions 113 to 116), and then copy the value that the body of the function placed in the stack to that free space (instructions 117 to 119), which ends up storing the number 10000 (hex 0x2710) in memory. See? we’re getting good at this! If you don’t believe me, just step through the opcodes in Remix. Sounds complex but it’s not.
Finally, the code will figure out the size of the data that needs to be returned. Let’s look at that next.
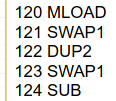
It first loads the memory pointer again, and compares it using a subtraction to the previous memory pointer in instructions 120 to 124, most likely in an attempt to calculate the size of the data to be returned. This value seems to be hardcoded anyway in instruction 125, which may seem redundant. It’s probably the result of the optimizer realizing that the return data size can be hardcoded to save some gas and, after applying the optimization, some residual opcodes are left behind.
This is a perfect example of strange bytecode that apparently does nothing relevant or seems redundant. It’s OK to ignore opcodes that don’t seem to be accomplishing anything, and learn to live with them (or “through them” let’s say) and simply move on. As you read more and more bytecode, you’ll start identifying the purpose of these generic, apparently hollow structures in sudden short bursts of enlightenment.
That’s enough esoteric nonsense for now. Let’s get our feet back on the ground.
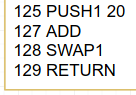
Instruction 125 will push the number 32 to the stack (hex 0x20) and add it to whatever our magical offset was, from our previous generic calculation (which was 0 anyway) swap the values around to match the order in which RETURN consumes its values …aaaand BOOM, the user has the totalSupply value returned.
OK. So, we saw how the code was routed from the function selector, into this wrapper structure that went into the function body, and out of the function body and then dealt with the translation of whatever the function body produced, and packed this data for returning it to the user. Well, shall we look at the other functions and see if we can observe a similar pattern in them as well?
If you’d like to take a break first, though, this would be the perfect time for it. What we’ll do next is simply reassure the structure we’ve just analyzed in the other two functions, with a little eye candy and a bit magic here and there along the way.

So, that’s one function; two to go. Let’s look at thebalanceOf function next.
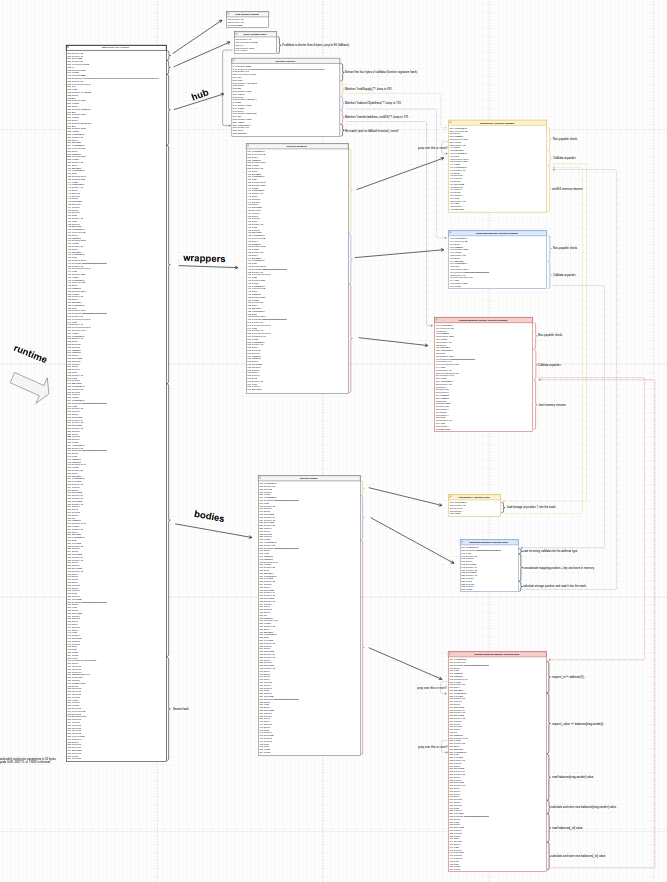
It ’s strongly advisable that you have a quick look around in the deconstruction diagram, to verify visually what just happened with totalSupply, and to get an idea of what we’re about to do with balanceOf.
The function selector should take us to instruction 130, which is balanceOf’s wrapper, and from there take us into the function’s body and out of it, packaging the return value for the user. However, if you notice in the diagram, the code does jump into the function’s body as expected, but it returns to totalSupply’s wrapper instead of it’s own. Why?
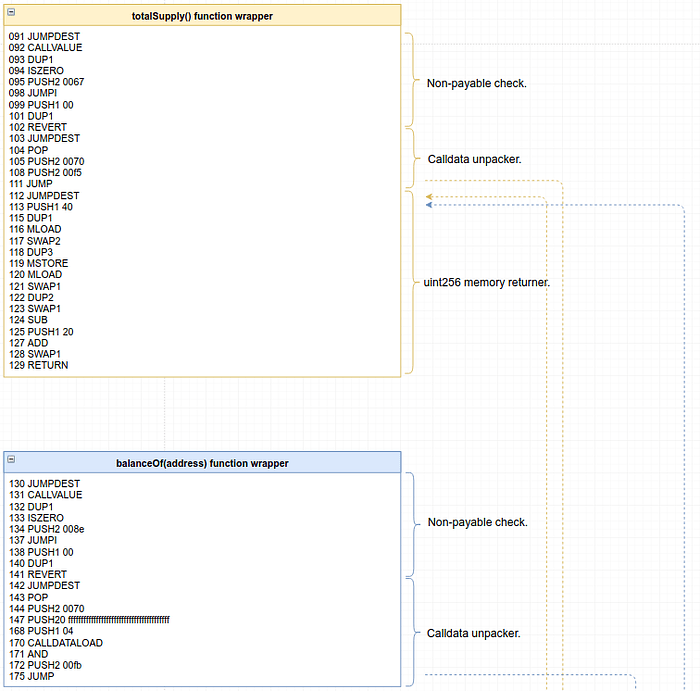
A tempting reason for this to happen could be that since totalSupply and balanceOf both return a uint256 value, the chunk of code that grabs a uint256 value from the stack and returns a uint256 via memory is identical, and could be reused. The Solidity compiler could be noticing that part of the code generated for these two wrappers is the same, and deciding to reuse the code to save on gas. Well, it actually does just that, and we wouldn’t be observing this if optimizations were not enabled when we compiled the contract. Let’s call this structure that’s being reused the “wrappers’ uint256 memory returner”. A nice exercise would be to compile the contract without optimizations and verify this yourself ;D
Remix time. Let’s start a new debugging session by using the same address that we used to deploy the contract and call thebalanceOf function. It should return the number 10000, since the creator of the token initially holds all the goodies. In the Debug area, step back to instruction 142, which is where the function selector left us this time.
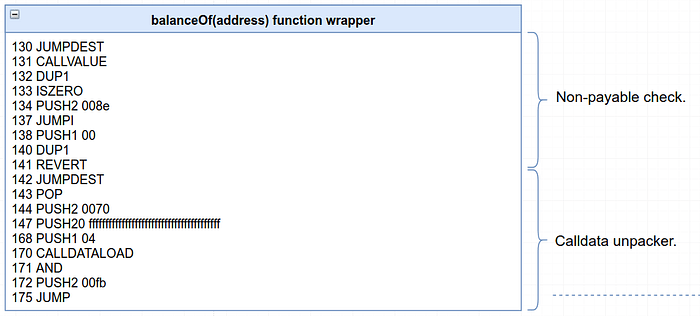
At instruction 144, 112 (hex 0x0070) is pushed to the stack — which, not surprisingly, is the location of the “uint256 memory returner” structure we just saw. The code is about to jump off to balanceOf’s body, and it’s remembering where to jump back to after the body is executed.
However, the jump into the function body at instruction 175 doesn’t happen right away. Something is going on before it actually makes the jump, between instructions 147 and 172.
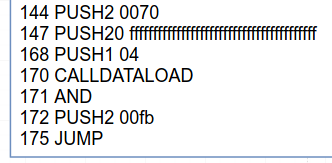
At instruction 147, a hexadecimal number with 40 f’s (20 bytes) is pushed to the stack, and then a 4. CALLDATALOAD is called with the 4 as an argument, which has the effect of reading the first word of data (32 bytes) from our calldata after the function id. If this sounds weird, then I’d recommend that you look at part III of the series, where we analyze how calldata works. This word is the argument we passed into the function call, which is the address whose balance we want to check in the call to balanceOf. This address is masked with the big 0xffffffffffffffffffffffffffffffffffffffff number for type checking/masking, and then the jump in instruction 175 is made to the function body targeted at instruction 251 (hex 0x00fb), with the address that was read from calldata, sitting comfortably in the stack and ready for use by the body.
And so, we witness that a function wrapper’s job is not only to redirect into a function’s body, and package whatever comes back from the body for the user, but also to package stuff coming from the user for the function’s body to consume. The function wrapper’s nature thus reveals itself to us in its full glory!

A function’s wrapper is an intermediary that unpacks the calldata for a function’s body to use, routes execution to it, and then repacks whatever comes back for the user. This wrapper structure is there for all functions that are part of the public interface of a contract in Solidity.
How this packing and unpacking is done, is something that is meticulously defined in Ethereum’s Application Binary Interface Specification, which specifies how incoming and outgoing arguments in function calls are encoded.
Now, let’s have a quick look at the 3 function wrappers altogether:
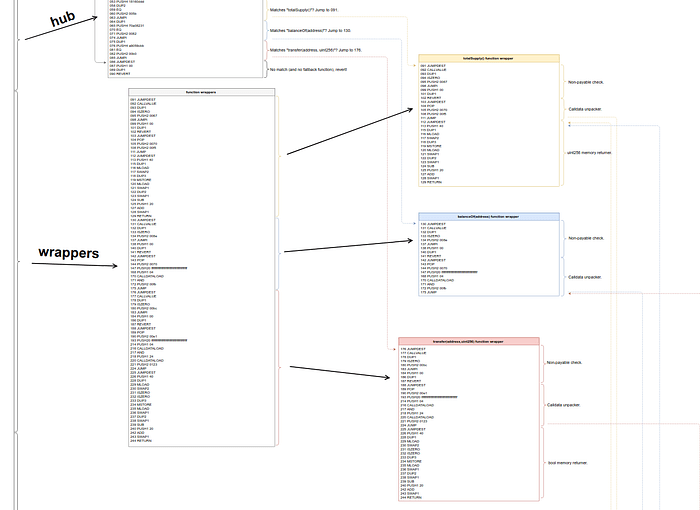
It’s easy to see, in a smart contract compiled by Solidity, that the big chunk of code that comes after the function selector is the function wrappers, one after the other. And yes, the actual function bodies is the next big chunk of code that comes after the wrappers, and after that there is this small peculiarity called the “metadata hash” that we’ll also see in a future post. But that’s it.
We’re beginning to see a grand architecture in EVM output produced by the Solidity compiler, and it’s slowly becoming less mysterious/chaotic. When analyzing a contract’s bytecode, you will quickly learn to first try to see where you are in terms of this grand structure before actually diving into the bytecode stepping details.
As we did in the previous parts of this series, we leave debugging of a call to the transfer function to you. You should see how the wrapper unpacks two values this time — the beneficiary’s _to address, and the _value transferred — sends that to the function’s body, and then grabs the body’s response and packs it back up for the user. Makes sense, right?
In the next part of the series we’ll finally look into the function bodies. Once we do that, there’s not really much else to do… Only a couple of details to cover, and we’re done. This divide-and-conquer strategy is really starting to give us dominion over the problem we set out to tackle at the start of the series, which seemed overwhelming at first but now is starting to become a pattern we can familiarize ourselves with. The next time you see an opcode, you will not be scared. You’ll look it in the eye and fiercely say “Oh yeah? You and what opcode army!” You’ll skim through any bytecode like a true Ethereum ninja.
Let’s look at the function bodies next.
- Deconstructing a Solidity Contract — Part I: Introduction ✔
- Deconstructing a Solidity Contract — Part II: Creation vs. Runtime ✔
- Deconstructing a Solidity Contract — Part III: The Function Selector ✔
- Deconstructing a Solidity Contract — Part IV: Function Wrappers ✔
- Deconstructing a Solidity Contract — Part V: Function Bodies
- Deconstructing a Solidity Contract — Part VI: The Metadata Hash


